

I'm not a metalworker but I can work with wood, so every problem has a solution with some grain in it.
I took a sheet of 3/4" plywood and cut it to fit into the recessed area in the rollcage. Note that the front of the cage has a slight bend to it (side to side) with the apex of the arc towards the front of the ATV. I cut my plywood to fit that curve. When I looked for places to bolt the plywood into I couldn't find any holes on the front. I added a piece of Hard Maple I had laying around as an extension to the plywood so I could get to a set of existing holes. My Ranger is new enough that I'm trying to avoid drilling holes.
The rollcage has a a bit of a curve to it going front to back. A flat piece of wood doesn't fit flat. Once my roof was fastened down it curves and fits fairly tight. If you wanted to avoid any stress to the wood caused by the curve then use two thinner sheets of plywood. The thinner sheets will bend easier. Glue them together and then clamp them to the cage to lock in the bend while the glue dries.
I had to notch out the front corners due to a welding puddle in the rollcage corners.
![]()
All exposed edges were rounded over, including the back edge.
![]()
What it looks like before the paint. I had intended to glue the maple to the plywood but in my excitement to get it painted I forgot.
![]()
I painted it with Truck Bed Coating from Rust-Oleum. If you use this be sure to apply it with a roller in a very well ventilated location. Rust-Oleum sells an Applicator Kit but you can get by with buying just the rollers if you can find them. The roller that came in the kit was supposed to be usable for two coats but it disintegrated on the second coat leaving small pieces of it embedded in the paint. Don't use the brush from the kit. The bristles in the brush started to come out right away and were left in the paint.
![]()
I couldn't get the front corners to lay down without drilling a new hole and putting a bolt in at the corner. At this time it isn't worth doing that.
![]()
![]()
Here you can see that the plywood fits nicely into the recessed area of the rollcage.
![]()
![]()
I put in the eye bolts so that I could easily secure equipment on the roof.
![]()
One of these days I'll fill in the three holes at the front of the roof.
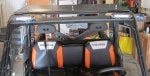
Also pictured are my newly installed Rigid Industries single row LED bars. I thought about installing them on the wood roof but I like where they ended up.
I took a sheet of 3/4" plywood and cut it to fit into the recessed area in the rollcage. Note that the front of the cage has a slight bend to it (side to side) with the apex of the arc towards the front of the ATV. I cut my plywood to fit that curve. When I looked for places to bolt the plywood into I couldn't find any holes on the front. I added a piece of Hard Maple I had laying around as an extension to the plywood so I could get to a set of existing holes. My Ranger is new enough that I'm trying to avoid drilling holes.
The rollcage has a a bit of a curve to it going front to back. A flat piece of wood doesn't fit flat. Once my roof was fastened down it curves and fits fairly tight. If you wanted to avoid any stress to the wood caused by the curve then use two thinner sheets of plywood. The thinner sheets will bend easier. Glue them together and then clamp them to the cage to lock in the bend while the glue dries.
I had to notch out the front corners due to a welding puddle in the rollcage corners.

All exposed edges were rounded over, including the back edge.

What it looks like before the paint. I had intended to glue the maple to the plywood but in my excitement to get it painted I forgot.

I painted it with Truck Bed Coating from Rust-Oleum. If you use this be sure to apply it with a roller in a very well ventilated location. Rust-Oleum sells an Applicator Kit but you can get by with buying just the rollers if you can find them. The roller that came in the kit was supposed to be usable for two coats but it disintegrated on the second coat leaving small pieces of it embedded in the paint. Don't use the brush from the kit. The bristles in the brush started to come out right away and were left in the paint.

I couldn't get the front corners to lay down without drilling a new hole and putting a bolt in at the corner. At this time it isn't worth doing that.

Here you can see that the plywood fits nicely into the recessed area of the rollcage.


I put in the eye bolts so that I could easily secure equipment on the roof.

One of these days I'll fill in the three holes at the front of the roof.
Also pictured are my newly installed Rigid Industries single row LED bars. I thought about installing them on the wood roof but I like where they ended up.


