PRC Polaris Ranger Club banner

Roll-ur-own Fuse/Relay/Ground box

Tags
rfrm rtmr
43K views 24 replies 13 participants last post by  fswan  
#1 ·
A lesson I took away from my Ranger is that I am going to add ‘stuff’ and that stuff, over time, makes for a mess of wires! Bound and determined to better with my RZR, I searched for a single box that would house my fuses, relays, and grounds. No such thing (a few come close...). So I made my own. Got the idea from a Jeep forum I stumbled on. So here’s what I did:

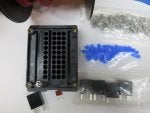
Step 1 – buy some hardware. I settled on a Bussman 15303-5 Rear Terminal Mini fuse and Relay (RTMR) panel. It is made to accept Metri-Pack 280 terminals and plugs and the holes are spaced to accept ATM mini fuses and 301 Micro relays. This is the back of the panel where all the wiring is done.


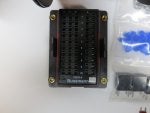
This is the front side where the relays and fuses plug into.


Here is my plan of attack. Three relay + fuse circuits, and three fuse-only circuits. Room to expand later if needed. Please excuse the non-standard symbols and sloppy computer work.


Next, I made up the wires. The ends that go into the RTMR are the Metri-Pack female terminals and the ends that go to the devices (winch, radio, lights, etc) are Weather Pack 280 terminals. I crimped and soldered all the connectors. More about that other terminal block in the picture later.


Wasn’t real crazy about how I was going to handle the needed ground wires. I am not a big fan of chassis grounds - they are fine when done right, but I prefer to buss them together back to the battery. I had bought a ground block from Black Rino Performance but once I had it in my had, I was disappointed. Really wanted to have everything on one block. I hit on the idea of using a home fuse panel terminal strip so I picked one up and after a little Dremel and file work, got it to fit in the RTMR. Happy camper!


This is what the wires look like plugged in – and my ground buss. The coil of smaller red wires are the relay trigger (post #86 on the relays) wires that go the dash switches. I coated all the plugs and and terminals (except for where the terminals actually make contact) with dielectric grease. The green things are plugs that seal up the unused holes in the RTMR. Between the plugs and the grease, it should be pretty much water proof.


Finished product. All pigtails have female connectors and are color coded. I will have to install the Weather Pack male connectors and shrouds on the devices I install. Each pigtail (except the trigger wires) has a power and ground wire thus eliminating device chassis grounds. RTMR will mount to the inside passenger firewall on 1” nylon standoffs. Power and ground from the aux battery will be 8 Gauge SXT cable.


#5 ·
That is some fine lookin work. Thanks for your time and effort to post.
 
#10 · (Edited)
Several ways to build this; buy each component separately, buy a kit, or buy the whole thing put together to your specs.

Couple years ago, these guys would do a complete custom RTMR panel to your specs – not sure if they still do, but they do nice work on switch panels;
http://www.teamconcours.com/switch-panels/?album=3&gallery=5

These guys have a set of the basic components that include (this is route I took);
http://www.dirtboundoffroad.com/aux-relay-fuse-panel.html
Bussmann 15303-5 Mini Fuse and Micro Relay panel (RTMR)
Five 35A micro relays
Bag of Delphi Metri-Pack 280 Series Tangless Female Terminals for 14-12 GA wire
Bag of Blue (for 14-12 GA wire) Cable Seals
You supply the wire, fuses, plugs (for the unused holes), and the Weather Pack connectors.

If you want to put together this setup from scratch, these are the individual components you will need:
Bussmann 15303-5 Mini Fuse and Micro Relay panel (RTMR) – do a Google search to find the best price.

Terminals that plug into the RTMR that accept the 301 micro relays and the mini (ATF) fuses (1/4”) – 12110845 Delphi Metri-pack 280 Series Tangless Female Terminals, 14-12GA
http://www.waytekwire.com/item/31069/METRI-PACK-280-SERIES-TANGLESS-FEMALE/
Relay – Song Chuan 301-1A-C-R1 http://www.waytekwire.com/item/75730/

The individual terminals, seals, and housings for the Weather Pack connectors will vary depending on the gauge wire you choose (I used 12ga for everything except for the trigger and ground wires for the relays – I used 16ga for those). http://www.performanceplusconnection.com/index.php?app=ecom&ns=catshow&ref=WaterproofElectricalConnectors&count=10&offset=0
Plugs for unused holes in the RTMR and the Weather Pack connectors - Delphi 15324928 / 12010300 Weather Pack/Metri-pack 280 Connector Cavity Plugs
The Performance Plus Concepts link above has Weather Pack kits that contain the housings, (called shrouds and towers) terminals, and wire seals in many different configurations or you can buy bulk components and build what you need. Pay attention to the wire gauges, the terminals and wire seals are different for the various gauges.

Ground bar – Home Depot http://www.homedepot.com/p/Square-D...by-Schneider-Electric-9-Terminal-Ground-Bar-Kit-PK9GTACP/100161420#.UpOXVcRJOAg

Although you can probably struggle through with your present wire crimpers, I HIGHLY recommend you borrow or buy some specifically made for Weather Pack connectors. I ordered these and they made perfect “B” crimps every time. Although it says they work on 14ga wire, they worked great on the 12ga I used. http://www.performanceplusconnection.com/Item/WHPT_18 . I also picked up a set of these – came in real handy and there is a Summit store nearby. http://www.summitracing.com/parts/pco-0660pt/overview/
 
#11 ·
Well, dang... if you guys would stop setting the bar so high, I could work less and ride more! It's hell for us neophytes to try to keep up with the Jones's
 
#9 ·
Great job my friend
 
#12 ·
LOL


Sent from my iPhone using Tapatalk
 
#13 ·
Awesome job! Makes my current wiring look childish even though it was done well! I might have to rewire like this instead of using the Polaris standard Hot/Switch/Ground black under my hood. Again, excellent work!
 
#15 ·
I'm feeling intimidated......lol
 
#16 ·
Looks great man. Nice to know some other people still tackle these besides me. I make and sell these in custom configurations for people. I also Make the larger version with 40 fuses and 10 relays. Check out my for sale thread in my signature.
 
#17 ·
Jesus bro, you're making the rest of us look bad. I just installed a Blue Sea fuse block. Now I have to put all the relays together! Sheesh! Very nicely done.:excitement::encouragement:
 
#21 ·
That is what I had before. Those damn relays kept getting me mad. Some were corroded, and there was a huge mess of wire STILL after I did the blue sea box. On this style vehicle, off road or sport leisure, where we are exposed to the elements CONSTANTLY. I really worried about it. One of my trips, I got mud all in the engine bay, some water too. Opened the hood, and saw there was mud all in the blue sea box. I mean caked in there. didn't know if there would be a short or what. SO, I disconnected it and pulled the pressure washer out to clean her out.

These were made for marine use, yes. BUT not in an open environment. They were made to be in the bowels of the vessel, or in the cabin of it. Where there is NO exposure to the elements. Our engine bays were not the intended use for this product.

Over the years, I have only seen 1 install of the blue sea box in person where they made a proper enclosure for it that was waterproof. Only a handful of sealed enclosures made for them on the internet too! Mostly, believe it or not, on import cars. Lowered vehicles and similar.

If we look at our fuse blocks in our personal vehicles that are under the hoods. They are protected by a cover that has some sort of water resistance. Now look at the Blue Sea box. Completely OPEN design. Scary really, if you really stand back and think about the investment.

I was not going to put a $60 blue sea block up against my $40k vehicle plus $20k in upgrades anymore. Saw a buddies truck burn up from an electrical issue.... Wasn't pretty. Having 4 children, my wife and myself in the vehicle. Yeah, I needed to do something.

Started making an enclosure, Nah, not happy. Still the damn relays. Put them in there too!? Damn, they were BIG and took up so much additional space. Plus half of the 8 relays I had were corroded already. Thats another out of pocket expense.

Went to a meet, considered the SPOD. Coincidentally, there was a guy with one (6 relays), there was me with the blue sea fiasco, then there was another guy. He said have I heard of the RTMR. WHAT? what are these acronyms he is tossing at me. He pointed to it and popped the sealed top. WTF!!!!!!!! I knew that had to be the solution for me. But, wait, there were only 5 relays. I would need 2 of them. Chuckles, NOPE, they make a 10! with 40 fuse slots! - Sold.

Moved some monies around and did what needed to be done. Before I even finished, i had 13 people asking me to make them the same when I was done with mine via PM. No stress, I'm an electronics guy. Come from a strobe background in electronics, micro miniature soldering and repair. These were a cake walk. The pain in the ass is the the crimping and the harnesses I make.
 
#18 ·
Nice work, Skygear! Thought about doing some of these and selling them but I am still not happy with my final configuration. I feel like the ground bar I added was the best custom feature - I am not a big fan of chassis grounds and didn't like the idea of wadding a bunch of ground wires together, then running a pig tail to battery ground. Mounting it was a struggle also. The Bussmann mount is nice but it's a little high for most Polaris'. I like how you made several different mounts for the Tacoma's. I used nylon standoffs. I've been thinking about a simpler connector than the WeatherPac but whatever I come up with has to maintain the IP66 rating (otherwise, what's the point!!). Soooo, I'm still working on the "Perfect Polaris Fuse Box" :distracted:
 
#19 · (Edited)
I like the Deutsch connectors. They are IP67 rated. The Proper tooling for them is way overpriced. I mean, I get it, It is one of those tool that is used in military and avionics industry. DMC AF8. It just kills it when I am selling them though. You can't sell it to a client unassembled and have them terminate the accessory they are connecting. It is just not practical. Then theres the option of me terminating the male and female leaving some leads... Still need to connect to the accessory. Using Waterproof Butt connectors on the ends solves this problem. Still they need to use a Heat gun after they crimp the butt connector. Not a problem for most. Still it would be an additional $20 tool or a lighter.


For the Negative. I considered doing what you did. Then I decided to order a different model number for my projects. These have BOTH studs. Positive and Negative. Issue with this config? You have to turn the relay upside down to get the proper orientation of the negative pin on them. Another downside, there is no access to that buss besides the stud and the relay pin. I solved this by making a daisy chained 10 gauge wire with a circle connector on the end. Added another nut to the neg buss stud and there you have it.

Heres a not so great shot of one of them recently done.


Basically, I took the 10 gauge and an Auto wire stripper. Every half inch I stripped it, leaving the wire sheath on it still. Then I pulled them all to one side. Cut lengths of wire, and soldered them into the 'chain'. Then as I finished ONE connection, I would pull down one piece of wire sheath exposing the next section to be soldered, and use Marine Heat Shrink Tubing with the internal Adhesive to seal that connection. Boom. Waterproof connection and a negative buss that integrates into the harness.

Not everyone wants that buss. Most of the people I have been telling to terminate the negative to the chassis on the vehicles wherever they can closest to the accessory. Cuts down on RF noise on longer runs, saves wire, keeps the harness nice and thin on the box side too. I mean, you are pulling the harness through the firewall. How big of a hole do you really want there. If you can't fit it through the stock harness hole, only other choice is making a new hole.

^Speaking of that, I need to get a nice rubber grommet for the hole I made. OR Find a bulkhead connector I am happy with.

Here is a better shot of one of the Neg studs, extra nut and the circle connector. <- the blue one under the harness. The One on top is for the ground to Chasis/ Battery

 
#20 ·
Mounting options.... WELL> I believe that all of these should be on some sort of breaker or fuse inline from the battery just in case there is catastrophic failure. Is saying this, Getting a piece of aluminum and cutting out a proper mount for one to mount all the goodies is what I feel the proper way to do it. I do realize that on this platform, space is highly limited. Where theres a will theres a way though.
 
#23 ·
Yeah - I thought about daisy-chaining the grounds then terminating them into a heavy duty quick-disconnect of some sort but I decided against it in favor of maintaining easy future reconfigurations of the RTMR. Glad to hear there is a 15303 model that has a ground lug! RF interference can be a real issue with these machines, especially with VHF/UHF two way radios. Couple of other things I did were to color code the looms on both the tower and shroud ends of each circuit (and the triggers wires for the relays) with different colors of shrink to make it easier to identify the circuits, especially when out on the trails. I also coated both the inside and outside of the cable seals and the outside if the cavity plugs with dielectric grease during assembly - probably a bit anal, but I just happen to have a large tube of the stuff anyway! For added protection against heat (big problem with these machines), I used only TXL and GXL wire.
 
#24 ·
Nice. There are definitely many ways to skin a catfish! The plugs I use are nice and oily so I opted to not do the grease. If someone asked me to do that sort of thing for them, I wouldn't hesitate though.

I can see where these get submersed that every extra little precaution pays off.
 
#25 ·
I had almost forgot about this! A mind is a terrible thing to waste!