PRC Polaris Ranger Club banner

FAN ON/OFF/AUTO, dome light, winch rocker, all look factory

36K views 121 replies 22 participants last post by  mrxlh  
#1 ·
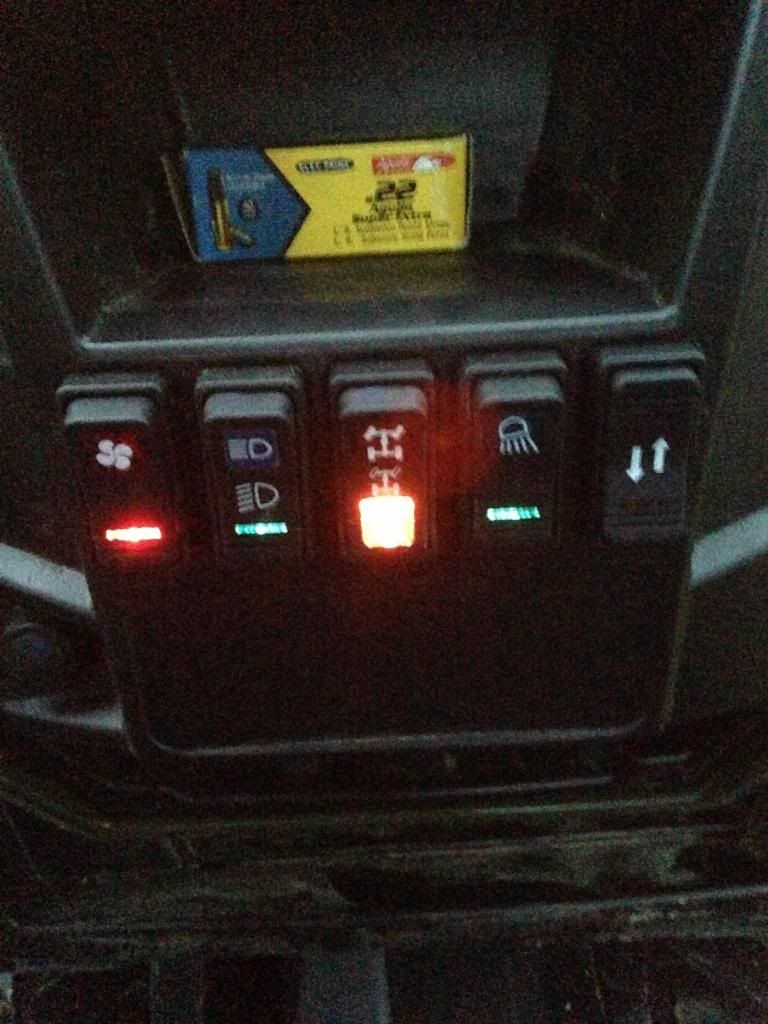
Just thought I would show my factory looking installed switches. I had to buy the fan switch that was just ON/OFF just to steal the face of it to put on the ON/OFF/ON switch. I used waterproof hella 40 amp relays to keep all the voltages separate. These are all OTRATTW switches


So heres how the fan works, in the down position the bottom light is on and the fan works normally in auto,(light stays on to indicate its in auto), in the middle position the fan is off and does not work at all "I like this for entering water or deep mud to keep from burning the fan up", In the up position the bigger light with the fan on it is on and the fan runs constant as long as the key switch is on!

The winch rocker lights up the upper light when pressed, and the lower light when pressed. its momentary.

The dome light lights up the top with light pointing down when its turned on, the lower light comes on whenever the key is turned on. Kind of like a dash light.

If anyone has questions please ask. Its alot of wiring but i can explain it hopefully. also if anyone has any electrical questions just ask, I install and program Honeywell, Johnson controls, and facility explorer ddc controls for a living.

Image


Image


Image


Image


Image
 
  • Like
Reactions: Saddletramp
#4 ·
The fronts of the switches are waterproof. I have the heat shrink connectors on the rear pins. Yes they fit the factory holes. They are the same model switches as factory. I also added a small led by the cluster to indicates if the fan is trying to come on and a have the fan switch in the completely off position and forget to put it back in the auto position.

Thanks for the complement
 
#5 ·
Image


Nice work I am running the same ones from OTRATTW. You can get the connector blocks and pins like the factory uses as well from them.
 
#6 ·
Very nice. But what's the one in the middle for. I can't tell from the pictures. And it does not look like the other factory looking ones.
 
#7 ·
Thats for the heated seat control it fits in there pretty good. Little worried about it getting wet, but I've hosed the dash a few times and it still works great. I used this kit from eGay. I mainly put it in because I wanted to take the seat covers off and grind the corners of the plastic trays to keep them from poking throught the material. I already had one poke through after the first ride.
http://www.ebay.com/itm/2-seats-ins...pt=Motors_Car_Truck_Parts_Accessories&hash=item2326adbd36&vxp=mtr#ht_1296wt_909
 
#8 ·
While the switches look good and you have obviously put alot of work into it. What really excited me was that box of 22 Shells! I didn't think you could find those anymore let alone leaving them out where everyone can see them Sweet! :lol:
 
#9 ·
Yeah I build 10/22s. I have quite a few cases. Not bricks. But cases with 10 bricks per case in them. Maybe I should start a show off your ranger 900 piece gun. I have a couple riders. My main one is my suppressed 10/22 which is why u seen those aguila sub sonics
 
#11 ·
not hard at all if you can follow instructions or have a basic knowledge of relays, if you want a write up of how to just let me know. but it does involve 2 water proof relays and 2 switches from otttra just to take the face off one to use on the other. I also made a dash indicator light, in case i forget to turn it back on and it tries to come back on the led will blind me saying hey, "fans trying to run but you have them turned off"
 
#17 ·
I actually don't even have a winch yet but all u will need to do is feed the common leg "24 volts" on the back of the winch switch that sends power to either leg when that up or down button is pushed. And shoot the up leg to the winch in leg and the down leg to the winch out leg. Or visa versa which ever way you prefer to be in and out.
 
#18 ·
berto said:
why 2 switches?

Ive got a 3 way switch from him i was hoping to use.

I bought the fan switch for the fan face only to put on my 3 way switch. A three way switch is all that's needed. But they don't make a 3 way with the fan decals on it. So I bought the two way switch with fan decal. Popped the face off of both and stuck it on the three way. Does that make sense lol
 
#19 ·
Also on the bottom light of the three way I did not use it like a conventional illumination light like the others. I made it where it only comes on when the fan is selected in auto.

So. Fan button all the way down. Means the small slit on bottom is lit

Fan button in middle. No lights on what so ever BUT if fan does try to come on in auto it illuminates an led on the dash by my speedo cluster

Fan button up. Means fan is running no matter what and larger upper light is lit with the fan decal I hope this helps. I will try to draw a wiring diagram latter if anyone wants to go it. It's alot of confusion to some but bullet proof.

Lastly. If my factory fan relay craps out I can always put it to manual on and drive it home.
 
#24 ·
Also on the bottom light of the three way I did not use it like a conventional illumination light like the others. I made it where it only comes on when the fan is selected in auto.

So. Fan button all the way down. Means the small slit on bottom is lit

Fan button in middle. No lights on what so ever BUT if fan does try to come on in auto it illuminates an led on the dash by my speedo cluster

Fan button up. Means fan is running no matter what and larger upper light is lit with the fan decal I hope this helps. I will try to draw a wiring diagram latter if anyone wants to go it. It's alot of confusion to some but bullet proof.

Lastly. If my factory fan relay craps out I can always put it to manual on and drive it home.
a wiring diagram of this or just tell what wires go where I think I know what I have to do but not 100% sure

Ordered my switch today ...
 
#20 ·
Hey Jacob, just checking in to see if you've had time to draw up a wiring diagram for your fan mod. I noticed in your initial post there were 2 relays... Are these both wired to same switch? If you'd include how you wired in the relays as well, that would be greatly appreciated. Did you use those VCH-01 connector blocks, or just insulated terminals with your switches? (Just wanted to know before I order all my switches) Also, did you install an auxiliary fuse block, or is everything wired to the 3-post block under the hood? Thank you for your time. Hook a brother up!
 
#21 ·
sorry I have been extremely busy and strung out with work. I did not use the blocks, I just used insulated terminals. I am going to try my best to have it for you by this weekend. I used the three terminal block under the hood also. No fuses
 
#22 ·
I greatly appreciate your time, Bro! I understand completely about being covered up with work, so please don't put yourself out... I'm in no rush to wire mine up. I'll be at work for a couple weeks myself, and still have to order the switches. Thank you for your quick response on the terminals and fuse block, I did want to get everything I needed lined up.
 
#23 ·
I need to know how to do this myself ordered a harness from electrical connection but do not know how to wire it to A three stage switch.
 
#25 ·
Sorry I have not been on lately on this subject. I will have to take the dash panel off and go over it again and draw it out. A word of advice to anyone doing this. Do not put the switch in the panel if you have center riders, or a small child that loves buttons. I absolutely love this switch on my bike but have found it off several several times from people, children, night fumbling, friends wanting to ride around the yard and just flipping switches, etc etc. I moved mine and will post a pic friday of where. Give me until friday afternoon and I will do my best at a write up on the wiring. I cannot tell you where to connect it with your harness. Only the one I built but I will do my best. Let me draw this up and scan it friday and I will help you the best I can. It does require relays. Do you have them??? I strongly suggest waterproof relays!!! Please give me a few days as work is bad but I should have friday off. I may even get off early tomorrow if I am lucky.
 
#27 · (Edited)
It was in the very first sentence in my very first post!

waterproof hella 40 amp relays, got them off ebay, I do not suggest the autozone or any other store bought non-sealed relay as simple humidity can make the contact corrode and fuse up if they sit to long.
 
#28 · (Edited)
This maybe way over my head with relays and such. I have searched all over for a diagram of this so when I when I get my switches in I know how to do it.